Create an app in Autodesk
- First, create an account on Autodesk if you don’t have one already
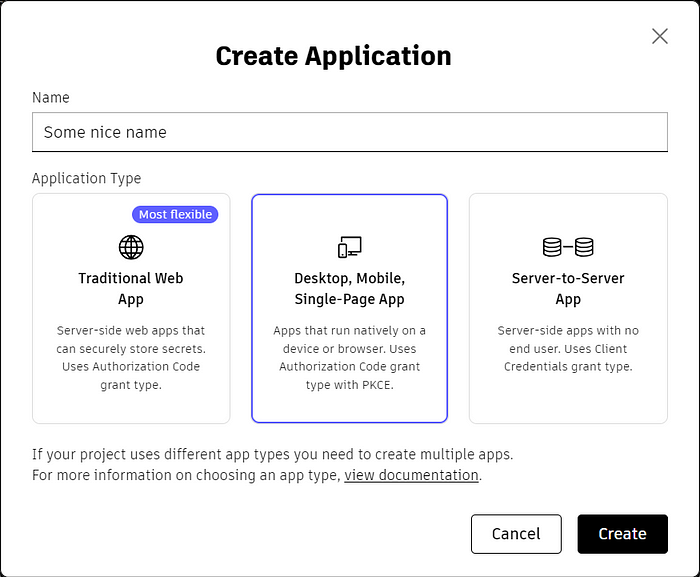
- Go to https://aps.autodesk.com/myapps/ and create an app

- Give a meaningful name to the app, and make sure you choose “Desktop, Mobile, Single-Page App” from the options.

- Copy the client id and store it in the environment variable (check this story to know how to create and use environment variables in Flutter)

Setup callback URL
- Install the flutter package flutter_web_auth_2
- Form your callback URL in the pattern <some-schema>://<app-package-name>, e.g., sample_schema://com.your_company.app_name. Note this URL
- In the Autodesk app, that you just created, in addition to http://localhost:8080/ add the callback URL you just formed
- For Android, update the AndroidManifest.xml as below, and add activity as below
<activity android:name=“com.linusu.flutter_web_auth_2.CallbackActivity” android:exported=“true”>
<intent-filter android:label=“flutter_web_auth_2”>
<action android:name=“android.intent.action.VIEW” />
<category android:name=“android.intent.category.DEFAULT” />
<category android:name=“android.intent.category.BROWSABLE” />
<data android:scheme=“sample_schema” android:host = “com.your_company.app_name” />
</intent-filter>
</activity>
- In iOS, for “normal” authentication, just use this library as usual; there is nothing special to do. To authenticate using Universal Links on iOS, use
httpsas the providedcallbackUrlScheme
final result = await FlutterWebAuth2.authenticate(url: "https://my-custom-app.com/connect", callbackUrlScheme: "https");
Login user
- We need to log in the user in 2 steps, get the authorization code and then use it to get the auth token of the user
- To get the authorization code, you can call the API https://developer.api.autodesk.com/authentication/v2/authorize as below
  @override
  Future<bool> login() async {
    final authorizationUrl = Uri.parse(
      'https://developer.api.autodesk.com/authentication/v2/authorize',
    ).replace(
      queryParameters: {
        'client_id': Environment.clientId,
        'response_type': 'code',
        'redirect_uri': Environment.callbackUrl, // The callback URL you formed
        'scope': 'data:read',
        'code_challenge': Environment.codeChallenge,
      },
    ).toString();

    try {
      final result = await FlutterWebAuth2.authenticate(
        url: authorizationUrl,
        callbackUrlScheme: Environment.customUriScheme, // Part of the callback URL you formed
      );

      final uri = Uri.parse(result);
      authorizationCode = uri.queryParameters['code'] ?? '';

      return _getAccessToken();
    } catch (e) {
      Dependency.logging.error('Error during authentication: $e');
      return false;
    }
  }
- Now use the authorization code to get the access token using the API https://developer.api.autodesk.com/authentication/v2/token as
 Future<bool> _getAccessToken() async {
    final tokenUrl = Uri.parse(
      'https://developer.api.autodesk.com/authentication/v2/token',
    ).toString();
    final response = await Dependency.network.post(
      Uri.parse(tokenUrl),
      body: {
        'clientId': Environment.clientId,
        'grantType': 'authorization_code',
        'code': authorizationCode,
        'redirectUri': Environment.callbackUrl,
        'codeVerifier': Environment.codeChallenge,
      },
      authenticateRequest: false,
    );

    Map<String, dynamic>? responseJson;

    try {
      responseJson = jsonDecode(response.body);
    } catch (e) {
      Dependency.logging.error('Unable to parse the response: $e');
      return false;
    }

    final accessTokenData = AccTokenResponse.fromJson(responseJson!);

    // accessTokenData.accessToken -> Your access token

    return true;
  }
That’s it! Now you can use this access token to call the other APIs of Autodesk.
Here to make the community stronger by sharing my knowledge and experience. Follow me and my team to stay updated on the latest and greatest in the tech world.
